 Download assets
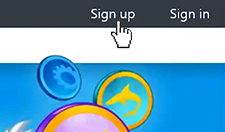
Step 1: Sign up
Visit redcritterconnecter.com and click Sign up on the top right of the page.
If you already have an account, skip to Step 5.
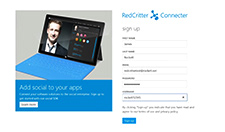
Step 2: Fill out information
Fill out the information requested; be sure to enter your proper email address as it will send you a verification email.
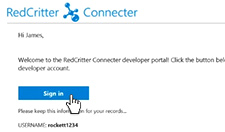
Step 3: Find verification email
Find the Welcome email that was just sent to you and click the Sign in button.
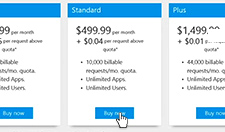
Step 4: Choose Pricing Plan
Choose the pricing plan that matches best with the app(s) that you're creating.
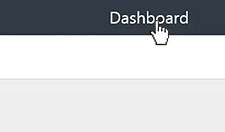
Step 5: Go to your Dashboard
After signing in and confirming your pricing package, click Dashboard on the top right.

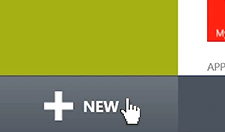
Step 6: Create New App
Click the + NEW link on the bottom left of the page.
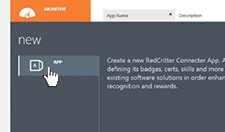
Step 7: Configure App
Click App and type your app's name and description, check edit after saving and click Create new app.

Step 8: Edit App Icon
To change the icon associated with your App, click edit next to App icon.
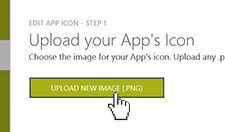
Step 9: Upload New Image
Click the Upload new image button and select a .PNG image from your computer.
Hint: PNG images with transpareny (or an alpha channel) work best. Download the sample assets for reference.
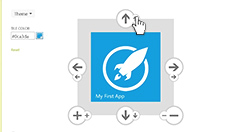
Step 10: Design Image
Move and scale your image to fit inside of the square area. Don't forget to change the background color. Click the bottom right arrow to save your changes.
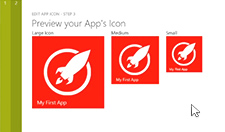
Step 11: Preview your App's Icon
Check out your App's icon at a large, medium and small size. You can click the bottom left arrow to go back and make adjustments, otherwise click the bottom right arrow to save.
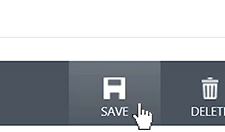
Step 12: Save your App
Click the Save button on the bottom of your App's page to save your changes.
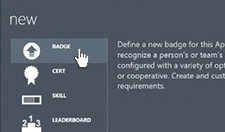
Step 13: Create new Badge
Click + NEW on the bottom left of the page.
Step 14: Configure new Badge
Click Badge and type your new badge's name and description, check edit after saving and click Create new badge.
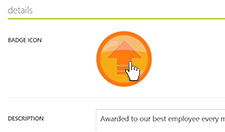
Step 15: Customize Badge Icon
To change your Badge's icon, click the current badge icon near the top of the page.
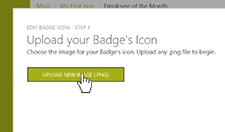
Step 16: Upload New Image
Click the Upload new image button and select a .PNG image from your computer.
Hint: PNG images with transpareny (or an alpha channel) work best. Download the sample assets for reference.
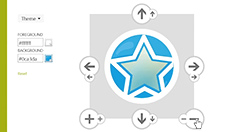
Step 17: Design Image
Move and scale your image to fit inside of the square area, then set the badge's colors. Click the bottom right arrow to save your changes.
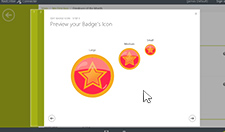
Step 18: Preview your Badge's Icon
Check out the large, medium and small sizes of your badge icon. You can make more changes by clicking the bottom left arrow to go back and repeat Step 17.
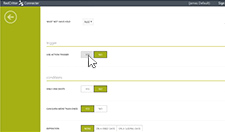
Step 19: Configure your New Badge
Scroll down the page and use the drop down menus to configure prerequisites, action triggers, conditions and more.

Step 20: Save changes
After configuring your new badge, click Save.
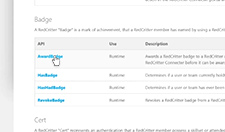
Step 21: Award Badge
The easiest way to award your new badge to someone is with a simple link. Visit the Learn section on our homepage and find the AwardBadge API function.
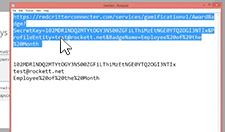
Copy the URL string into a text editor, like Notepad. To use this method, you need to replace the {SecretKey}, {ProfileEntity} and {BadgeName} variables.
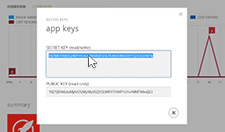
Step 22: Find your Secret Key
To find your Secret Key, visit your App's dashboard and click the ACCESS KEY button on the bottom of the page.
Step 23: Configure API Call
Copy and paste the Secret Key into your text editor, replacing the {SecretKey} in the URL with your key.
Then, replace {ProfileEntity} with the email address of the user you want to award the badge to, and replace {BadgeName} with the name of your badge.
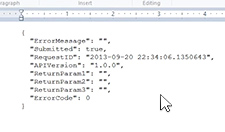
Step 24: Try API Call
After completing the URL string, copy and paste it into any browser. You should get a JSON response back letting you know whether it went through or not.
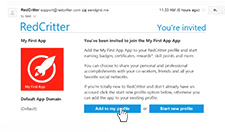
Step 25: Join App
If you sent a badge to a user that hasn't joined your app yet, they'll be sent a verification email to join. Users can add the new app to their existing profile or create a new profile.

Step 26: Check Activity Feed
From your main Connecter dashboard, click the Monitor button on the left side of the page. If the badge was successfully awarded, you should see it.
Hint: You can see all detailed account activity in real time
That's it!
Now you know how to create an App using RedCritter Connecter. You're awesome!