 Download assets
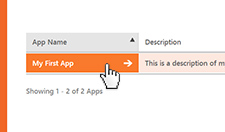
Step 2: Find your App
Select the App that you'd like to add a Cert to.
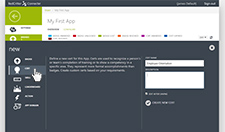
Step 3: Create New Cert
Click + NEW on the bottom left of the page and click Cert.
Write a title and description for your new Cert, then click Create New Cert.
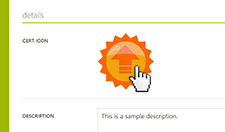
Step 4: Edit Cert Icon
To change the icon associated with your Cert, click it's current icon.
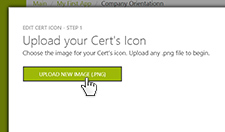
Step 5: Upload New Image
Click the Upload new image button and select a .PNG image from your computer.
Hint: PNG images with transpareny (or an alpha channel) work best. Download the sample assets for reference.
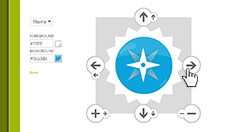
Step 6: Design Image
Move and scale your uploaded image to fit inside of the square area. You can also configure a foreground and background color.
Once you're done, click the bottom right arrow to save your changes.
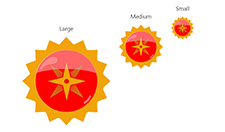
Step 7: Preview your Cert's Icon
Check out your Cert's icon at a large, medium and small size. Click the bottom left arrow to go back and make adjustments, or click the bottom right arrow to save.
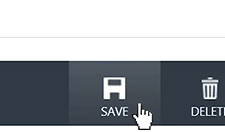
Step 8: Save your Cert
Click the Save button on the bottom of your Cert's page to save your changes.
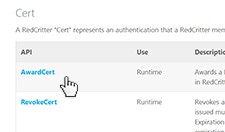
Step 9: Award Cert
The easiest way to award your new Cert to someone is with a simple link. Visit the Learn section on our homepage and find the AwardCert API function.
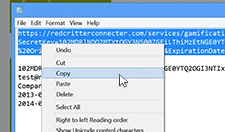
Copy the URL string into a text editor, like Notepad. You need to replace the {SecretKey}, {ProfileEntity}, {BadgeName}, {DateIssued} and {ExpirationDate} variables.
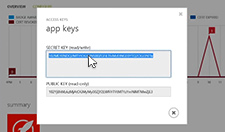
Step 10: Find your Secret Key
To find your Secret Key, visit your App's dashboard and click the ACCESS KEY button on the bottom of the page.
Step 11: Configure API Call
Copy and paste the Secret Key into your text editor, replacing the {SecretKey} in the URL with your key. Then, replace {ProfileEntity} with the email address of the recipient, replace {BadgeName} with the name of your badge and replace the {DateIssued} and {ExpirationDate} dates in YYYY-MM-dd format.
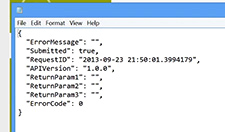
Step 11: Try API Call
After completing the URL string, copy and paste it into any browser. You should get a JSON response back letting you know whether it went through or not.

Step 13: Check Activity Feed
Look at the Activity Feed on your Cert's homepage. If you don't see the Cert, then something went wrong.
Hint: You can see all detailed account activity in real time
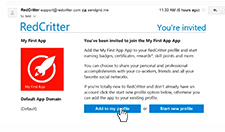
Step 14: Join App
If you sent a badge to a user that hasn't joined your app yet, they'll be sent a verification email to join. Users can add the new Cert to their existing profile or create a new profile.
You're Done!
Now you know how to create a Cert using RedCritter Connecter. You're getting good at this!